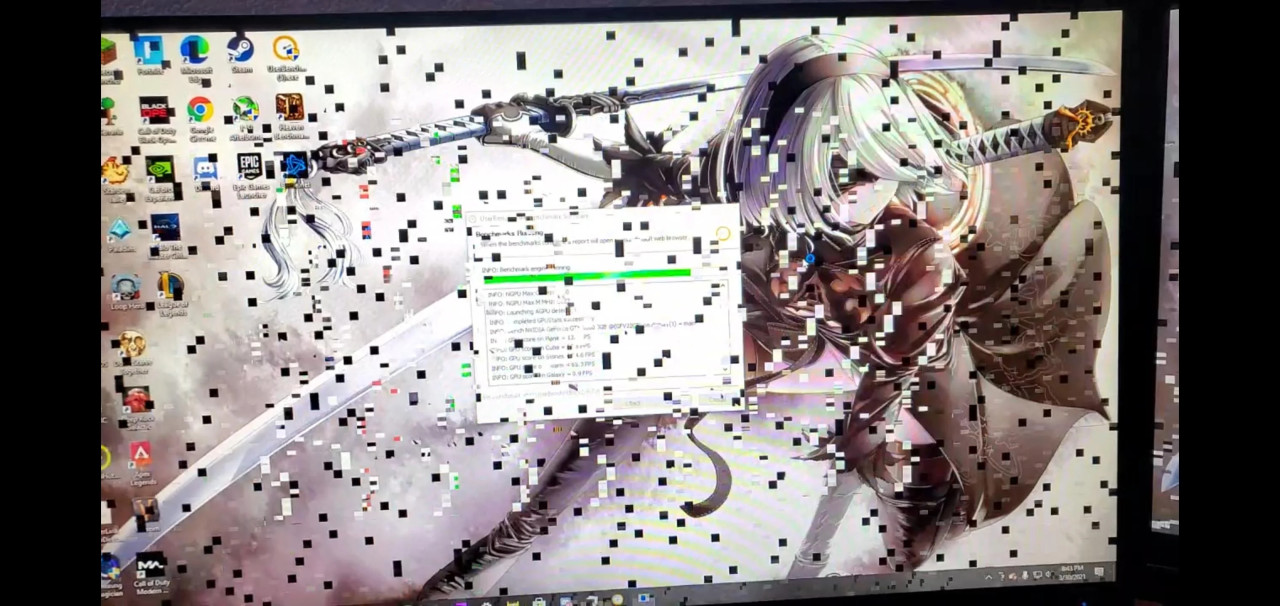
Recently, Windows 10 users have been noticing black boxes now and then while scrolling. If you are one of them, then this guide might help you. Not to mention, encountering black squares on screen while scrolling can be distracting.
Reportedly, black boxes or squares might keep popping up due to a display driver issue. However, incorrect display brightness, corrupted system files, and switching between dual graphics cards might be responsible too.
Let’s check out how you can eliminate the popping-up black squares on Windows 10 PCs.
1. Update Your PC’s Display Adapter
Outdated graphics drivers might result in black squares on screen while scrolling. Generally, display adapter drivers get automatically updated. However, you might have to update a driver that doesn’t receive automatic updates manually.
Here’s how you can update a graphics card driver manually:
- Bring up a Run dialog box with the Windows+R key shortcut.
- Type in ‘devmgmt.msc’ and click the OK button.
- Next, you have to locate and click the Display Adapters option to expand it.
- After that, right-click the graphics card and select the option named ‘Update Driver’ from the pop-up menu.
- Choose the automatic search option to allow the driver to update automatically.
As an alternative, you can head towards the graphics card manufacturer’s official website and update the driver manually. After you have successfully updated the driver, restart your PC and notice if the issue has been resolved.
2. Run System Scans on Your Windows Computer
As you know, corrupted system files can lead to black squares popping up on your PC screen. An SFC or DISM scan might help to scan these affected files and repair them accordingly.
Let’s check out how you can proceed with an SFC or DISM scan:
- Explore a Command Prompt with admin rights. Simply search for Command Prompt using the Windows+S key shortcut. Click the ‘Run as administrator’ option from the right panel.
- Type ‘sfc/scannow’ in the Command Prompt window and press the Enter key. The SFC or System File Checker scanning should work, and it will scan and repair corrupted files.
- The overall scanning might take a considerably longer time depending on your system files. In case this doesn’t help in eradicating the black squares, you can try a DISM scan.
- To perform a DISM scan, type in the following command on Command Prompt: dism /Online /Cleanup-Image /RestoreHealth. Hit Enter and wait patiently until the process completes.
This scan won’t work if you interrupt the process. Restart your Windows device and notice if those black squares stop appearing.
3. Try Built-in Troubleshooter for Hardware & Devices
Built-in troubleshooters on Windows devices can help you deal with numerous issues. For example, you can use the Hardware and Devices troubleshooter to eradicate black squares on screen while scrolling.
Here’s how you can make use of the troubleshooter:
- Navigate to the PC Settings with the Windows+I shortcut. Click the Update & Security tab.
- Next, click the Troubleshoot option from the left panel.
- Scroll down and locate the Hardware and Devices option. After that, click the ‘Dun the troubleshooter’ option.
Now, the troubleshooter will start detecting hardware issues automatically. Restart your PC once the troubleshooter has completed the task. Inspect whether the black squares keep popping up still.
4. Fix Black Squares on Google Chrome
Users have complained that they have noticed black squares only while surfing on the Google Chrome browser. Additionally, both Windows and macOS users have experienced the same problem. Hence, it’s not an OS-specific issue.
Here are a few solutions that you can follow to eliminate the issue:
Deactivate Hardware Acceleration
Navigate to Google Chrome and click the 3 vertical dots. Choose Settings and click the Advanced Settings option. Scroll down and toggle off the Hardware Acceleration option.
Create a New Profile on Chrome
This quick hack might work for you. Just create a new profile on the Google Chrome browser. Then, inspect if it has resolved the issue.
Disable Chrome Extensions
In case you can still experience black squares on screen while scrolling through Google Chrome, you can try disabling extensions. Click the 3 dots or Chrome Menu, and then hit the Tools option. Next, select extensions and disable them one by one to check which extension resolves the problem.
Reset Chrome Settings
Returning to default values or settings on your Chrome browser might eradicate black squares on screen. Navigate to Chrome Menu, followed by Settings. Then, click the ‘Reset and clean up’ option. Afterwards, click the Restore option to reset the Chrome Settings.
Try the Accessibility Feature
You can use this solution when you notice text boxes with a black border. Simply go to Chrome Menu and select Settings from the pop-up menu. Next, hit the Advanced option and choose the Accessibility feature.
Toggle the option named ‘Show a quick highlight on the focused object’. This might fix the bug, and you can surf the Google Chrome browser without seeing black boxes anymore.
5. Modify Display Brightness
Improper brightness on your PC display can make black squares keep flashing. You can reduce the display brightness and check if this works:
- Go to the Search box on your Windows PC and type in ‘power plan’.
- Next, choose the Edit Power Plan option from the search results.
- After that, click the option that says, ‘Change advanced power settings’.
- Choose Display from the left panel, and then select the Brightness and Colour option.
- Make sure that you reduce the brightness and never set it to 100%.
Save all the changes you have made and reboot your computer.
6. Deactivate Onboard Graphics Card
Are you using both external and internal graphics cards on your Windows PC? Then, it’s possible to face visual distortion on your Windows computer. Disable the onboard graphics card if you see black squares on screen while scrolling.
- Boot your device into safe mode. Use your PC manufacturer’s guide to enter the safe mode on your computer.
- Next, open Device Manager when your PC is in safe mode. Right-click the Start menu and click Device Manager.
- Click the Display Adapters option to expand all the display adapters on the computer.
- Locate the built-in display adapter and right-click on it.
- Next, select the Disable Device option from the pop-up menu.
After all, you can leave the safe mode. Examine if the black boxes still appear on your PC screen.
Finally, Scan for Viruses and Other Threats
Perhaps, you might be experiencing black squares on screen while scrolling due to a virus or malware attack. Try a trusted antivirus or anti-malware software to scan your Windows device and eliminate all the threats. Opt for expert intervention if the issue persists.